more space on /boot required

While doing a „yum update“ this message can be displayed:

Disk Requirements: At least 10MB more space needed on the /boot

That means the /boot is running out of space.

To free up there are at least two options:

Remove kernels manually

Check out your current running Kernel using

uname -a

Check the installed kernel versions with

 yum list installed | grep kernel

And remove not used kernel versions.

Use yum-utils

install yum-util

yum install yum-utils

Remove old kernel versions

package-cleanup --oldkernels --count=2

To make it persistent to only hold two versions change the conf file of yum:

vi /etc/yum.conf
installonly_limit=5

Using INetSim to redirect a particular IP

Having a small set of systems for malware analysis is a must hve of course, I have most of my envirenment in different VMs but sometimes you need to access IPs in the normal office LAN.

Here is a setup-example before:

Notebook eth0 192.168.1.22
- Remnux (watcher)
---- eth0 NAT 10.0.3.3 <--- sitting in the "good network"
---- eth1 VM malnet 192.168.99.99
---- inetsim listening on 192.168.99.99 offering various services

- Windows victim system (malho)
---- eth0 VM malnet 192.168.99.98 default gw 192.168.99.99

That is pretty simple, if malware running on the "malho" system and trying to connect to anything, it get's catched by inetsim and packetsniffers.

But now the interesting aspect: e.g. if you have a system:

SSH server
---- eth0 192.168.1.33

That you want to access from malho (could be any other service as well)

Use the following inetsim settings:


#############################################################
# Redirect
#############################################################

#########################################
# redirect_enabled
#
# Turn connection redirection on or off.
#
# Syntax: redirect_enabled [yes|no]
#
# Default: no
#
redirect_enabled	yes


#########################################
# redirect_unknown_services
#
# Redirect connection attempts to unbound ports
# to dummy service
#
# Syntax: redirect_unknown_services [yes|no]
#
# Default: yes
#
redirect_unknown_services yes	


#########################################
# redirect_external_address
#
# IP address used as source address if INetSim
# acts as a router for redirecting packets to
# external networks.
# This option only takes effect if static rules
# for redirecting packets to external networks
# are defined (see 'redirect_static_rule' below).
#
# Syntax: redirect_external_address 
#
# Default: none
#
redirect_external_address  10.0.3.3

#########################################
# redirect_static_rule
#
# Static mappings for connection redirection.
# Note: Currently only protocols tcp, udp and icmp are supported.
#
# Syntax: redirect_static_rule tcp|udp       
#         redirect_static_rule tcp|udp           
#         redirect_static_rule tcp|udp <:port>                
#         redirect_static_rule tcp|udp <:port>                <:port>
#         redirect_static_rule icmp     
#         redirect_static_rule icmp              
#         redirect_static_rule icmp    <:icmp-type>           
#
# Default: none 
#
# Examples:
#
# WWW caching service
#redirect_static_rule	tcp             :8080			:80
#
# Submission [RFC4409]
#redirect_static_rule	tcp             :587			:25
#
# Echo-Request [RFC792]
#redirect_static_rule	icmp 10.10.10.20:echo-request	10.1.0.25
#
# Redirection based on IP address and/or port:
#redirect_static_rule	tcp	10.10.10.55:88  	 10.10.10.1:80
#redirect_static_rule	tcp	           :99  	192.168.1.1:25
#redirect_static_rule	tcp	10.10.10.20:    	 172.16.1.2:
redirect_static_rule tcp 192.168.1.33: 192.168.1.33:
redirect_static_rule icmp 192.168.1.33:echo-request 192.168.1.33

#########################################
# redirect_change_ttl
#
# Change the time-to-live header field to a random value
# in outgoing IP packets.
#
# Syntax: redirect_change_ttl [yes|no]
#
# Default: no
#
#redirect_change_ttl	yes


#########################################
# redirect_exclude_port
#
# Connections to  on this port
# are not redirected
#
# Syntax: redirect_exclude_port 
#
# Default: none
#
#redirect_exclude_port		tcp:22
#redirect_exclude_port		udp:111


#########################################
# redirect_ignore_bootp
#
# If set to 'yes', BOOTP (DHCP) broadcasts will not be redirected
# (UDP packets with source address 0.0.0.0, port 68 and
# destination address 255.255.255.255, port 67 or vice versa)
#
# Syntax: redirect_ignore_bootp [yes|no]
#
# Default: no
#
#redirect_ignore_bootp		yes


#########################################
# redirect_ignore_netbios
#
# If set to 'yes', NetBIOS broadcasts will not be redirected
# (UDP packets with source/destination port 137/138
# and destination address x.x.x.255 on the local network)
#
# Syntax: redirect_ignore_netbios [yes|no]
#
# Default: no
#
#redirect_ignore_netbios	yes


#########################################
# redirect_icmp_timestamp
#
# If set to 'ms', ICMP Timestamp requests will be answered
# with number of milliseconds since midnight UTC according
# to faketime.
# If set to 'sec', ICMP Timestamp requests will be answered
# with number of seconds since epoch (high order bit of the
# timestamp will be set to indicate non-standard value).
# Setting to 'no' disables manipulation of ICMP Timestamp
# requests.
#
# Syntax: redirect_icmp_timestamp [ms|sec|no]
#
# Default: ms
#
#redirect_icmp_timestamp	sec

--> you can now ping and ssh from malho to 192.168.1.

Another handy thing is you can also hide your local ip:

 redirect_static_rule icmp 1.2.3.4:echo-request 192.168.1.33

--> you can now ping and whatever from malho using 1.2.3.4 and the malho will not get the actual IP.

Mount a VDH file within linux

To mount a VDH (Virtual Hard Disk) file in linux (e.g. ubuntu):

sudo apt-get install virtualbox-fuse
sudo mkdir /mnt/vhd-mountpoint/
sudo vdfuse -f disk.vhd /mnt/vhd-mountpoint/
mkdir /mnt/vhd-mountpoint
sudo mount -o loop  /mnt/vhd-mountpoint/Part1 /mnt/part1

VDH is mostly used within Windows 7 and newer.

VLC OSX dock history deactivate

To deactivate the history of recent files opened with VLC displayed in the OSX dock can be done with the following commands (execute in terminal):

defaults write org.videolan.vlc NSRecentDocumentsLimit 0
defaults delete org.videolan.vlc.LSSharedFileList RecentDocuments
defaults write org.videolan.vlc.LSSharedFileList RecentDocuments -dict-add MaxAmount 0

Restart dock:

killall Dock

Find more

Django 403 CSRF forbidden

The following error message:

Forbidden (403)
CSRF verification failed. Request aborted
More information is available with DEBUG=True

Might occur if you are using an apache / nginx running behind another Apache as a proxy.
To read more about CSRF go to wikipedia. It is basically an interception of a session exploiting the trust a browser has to a site.

So it is an security feature, that is interfered by the proxy.
You have most likely something like:

ProxyPass / https://$yourhost/
ProxyPassReverse / https://$yourhost/

In your apache config. That needs to be extended to:

ProxyPass / https://$yourhost/
ProxyPassReverse / https://$yourhost/
ProxyPreserveHost On

Quote from apache doc:

When enabled, this option will pass the Host: line from the incoming request to the proxied host, instead of the hostname specified in the ProxyPass line.

This option should normally be turned Off. It is mostly useful in special configurations like proxied mass name-based virtual hosting, where the original Host header needs to be evaluated by the backend server.

OpenOffice problem window restore

If your OpenOffice crashed running Apple OSX, you might run into a problem where a dialog is asking you wether you would like to restore your old windows / documents.

When you click one of the two options, nothing happens.

You can solve the problem (make a backup of the folder before deleting it):

THIS IS ON YOUR OWN RISK!

Quit open office (using task manager or alt+cmd+esc)
Open Terminal
cd  ~/Library/Saved Application State/org.openoffice.script.savedState
rm -rf *

That will delete all content of that folder.

Adding your own crt from a CA to ubuntu local ca store

If you are trying to for example develop python and accessing something encrypted with SSl and that SSL certificate is not signed by a well known CA you might get an error.

That is because your CA is not added to the local CA store of e.g. Ubuntu.

You can add your signatures by:

sudo mkdir /usr/share/ca-certificates/extra
sudo cp FOO.crt /usr/share/ca-certificates/extra/FOO.crt
sudo dpkg-reconfigure ca-certificates

Then the new certificates will be added to your local store.
(please be careful as sudo dpkg-reconfigure ca-certificates is only checking for files *.crt, so no *.cer etc).

Raspberry Pi migration to raspberry pi 2

Der Raspberry Pi ist ein äußerst erfolgreiches Gerät und erfrut sich gerade im Heimbereich großer Beliebtheit. Bemängelt wurden bis dato immer die etwas zu geringe Leistungsfähigkeit der CPU und der zu geringe Arbeitsspeicher (RAM).
Mit dem Rasperry Pi 2 wird an einigen Stellen (deutlich) aufgerüstet:

A 900MHz quad-core ARM Cortex-A7 CPU
1GB RAM

Like the (Pi 1) Model B+, it also has:

4 USB ports
40 GPIO pins
Full HDMI port
Ethernet port
Combined 3.5mm audio jack and composite video
Camera interface (CSI)
Display interface (DSI)
Micro SD card slot
VideoCore IV 3D graphics core

Gerade CPU und RAM und 4 USB Ports dürften erfreuen.

Nun möchte man jedoch nicht alle Pis neu aufsetzen. Möchte man die vorhandene Infrastruktur migrieren müssen ein paar Dinge beachtet werden:

Vorbereitung

Um das vorhandene System zu migrieren muss es erst auf den aktuellsten Stand gebracht werden:

sudo -s
apt-get update
apt-get dist-upgrade
apt-get install rpi-update
rpi-update
halt

(Quelle)
Diese Befehle bringen das System auf aktuellen Stand und fahren das System runter.

Backup

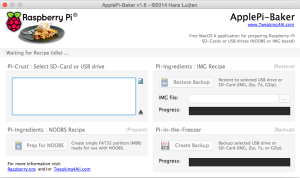
Bevor weitere Schritte durchgeführt werden auf jeden Fall ein Backup machen. Bei der Migration ist dieses Tool hilfreich: „Apple Pi Baker

Apple_Pi_baker

Damit kann zum einen Das Backup durchgeführt werden. Und ist auch danach noch sinnvoll.
Das Backup könnte pi_original.img heißen.

NOOBS

Für Nutzer, welche NOOBS genutzt haben um den Raspberry PI aufgesetzt haben sind folgende Anweisungen noch notwendig:

SD Card in PC / Mac mounten
download latest NOOBS Lite
Extract zip
Copy Everything extracted EXCEPT for `recovery.cmdline` to the root of your SD card

Source

SD Karte

Der Raspberry PI 2 unterstützt keine SD Karte mehr, es wird vielmehr auf Micro SD gesetzt, hier muss also eine neue Karte angeschafft werden.

Backup 2

Jetzt wird das Backup erstellt, welches dann auf die neue SD Karte überspielt wird (dieser Schritt kann übersprungen werden, wenn vorher schon eine Micro mit Adapter im Raspberry Pi 1 genutzt wurde)
Dieses Image nennt man pi_tomigrate.img

Dieses Backup spielt man nun mittels Apple Pi Baker auf die neue SD Karte (dauert insgesamt so ca. 40 minuten bei 16 GB)

Boot

Jetzt kann die Micro SD Karte in den Raspberry PI 2 eingesetzt und gebootet werden. Alle Daten werden erhalten und man kann direkt loslegen.

cat /proc/cpuinfo
processor	: 0
model name	: ARMv7 Processor rev 5 (v7l)
BogoMIPS	: 57.60
Features	: half thumb fastmult vfp edsp neon vfpv3 tls vfpv4 idiva idivt vfpd32 lpae evtstrm 
CPU implementer	: 0x41
CPU architecture: 7
CPU variant	: 0x0
CPU part	: 0xc07
CPU revision	: 5

processor	: 1
model name	: ARMv7 Processor rev 5 (v7l)
BogoMIPS	: 57.60
Features	: half thumb fastmult vfp edsp neon vfpv3 tls vfpv4 idiva idivt vfpd32 lpae evtstrm 
CPU implementer	: 0x41
CPU architecture: 7
CPU variant	: 0x0
CPU part	: 0xc07
CPU revision	: 5

processor	: 2
model name	: ARMv7 Processor rev 5 (v7l)
BogoMIPS	: 57.60
Features	: half thumb fastmult vfp edsp neon vfpv3 tls vfpv4 idiva idivt vfpd32 lpae evtstrm 
CPU implementer	: 0x41
CPU architecture: 7
CPU variant	: 0x0
CPU part	: 0xc07
CPU revision	: 5

processor	: 3
model name	: ARMv7 Processor rev 5 (v7l)
BogoMIPS	: 57.60
Features	: half thumb fastmult vfp edsp neon vfpv3 tls vfpv4 idiva idivt vfpd32 lpae evtstrm 
CPU implementer	: 0x41
CPU architecture: 7
CPU variant	: 0x0
CPU part	: 0xc07
CPU revision	: 5

Hardware	: BCM2709
Revision	: a01041
Serial		: REDUCTED

Meminfo:

vcat /proc/meminfo 
MemTotal:         949472 kB
MemFree:          476396 kB
MemAvailable:     860016 kB
Buffers:           90108 kB
Cached:           195736 kB
SwapCached:            0 kB
Active:           228896 kB
Inactive:          97048 kB
Active(anon):      40120 kB
Inactive(anon):      244 kB
Active(file):     188776 kB
Inactive(file):    96804 kB
Unevictable:           0 kB
Mlocked:               0 kB
SwapTotal:        102396 kB
SwapFree:         102396 kB
Dirty:                 0 kB
Writeback:             0 kB
AnonPages:         40144 kB
Mapped:            24088 kB
Shmem:               268 kB
Slab:             135256 kB
SReclaimable:     128760 kB
SUnreclaim:         6496 kB
KernelStack:         768 kB
PageTables:          852 kB
NFS_Unstable:          0 kB
Bounce:                0 kB
WritebackTmp:          0 kB
CommitLimit:      577132 kB
Committed_AS:      95684 kB
VmallocTotal:    1105920 kB
VmallocUsed:        3928 kB
VmallocChunk:     873148 kB