Timesketch on an Raspberry Pi3

TLDR

Does not work at the moment

Idea

Playing with Timesketch (timesketch.org) for a while I was wondering if it is possible to install Timesketch on a Raspberry Pi 3 to do some basic analysis, no heavy GB plaso imports and such.

A raspberry Pi is around 40 $, so pretty cheap and can be ordered almost everywhere on the planet, and you might already have some PIs from previous projects like:

I have also written about Timesketch / and or maintaining the following Github repositories:

Basic installation

I used the Noobs Image to install the raspberry using a 128 GB Micro SD card to have enough storage.

Java

Trying to install Java will cause some Java issues because you need to install it manually, follow:

https://www.raspberrypi.org/forums/viewtopic.php?t=101543

sudo mv /usr/lib/jvm/java-8-openjdk-armhf/jre/lib/arm/client /usr/lib/jvm/java-8-openjdk-armhf/jre/lib/arm/server

Installing Elastic Search

Follow that article:

Installing Timesketch

Simple, SSH to your raspberry pi and follow:

When installed elasticsearch:

vi /etc/elasticsearch/elasticsearch.yml

Add the following:

network.bind_host: 127.0.0.1

pycipher

This one is a bit tricky because it might fail with:

Collecting pycypher==0.5.9
Could not find a version that satisfies the requirement pycypher==0.5.9 (from versions: )
No matching distribution found for pycypher==0.5.9

Docker

https://medium.freecodecamp.org/the-easy-way-to-set-up-docker-on-a-raspberry-pi-7d24ced073ef

Docker-compose

sudo apt-get install docker-compose

So pycypher does kill the posibility to use Timesketch on a raspberry at the moment:

 Getting page https://www.piwheels.org/simple/pycypher/
  Looking up "https://www.piwheels.org/simple/pycypher/" in the cache
  Current age based on date: 30
  Freshness lifetime from request max-age: 600
  The response is "fresh", returning cached response
  600 > 30
  Analyzing links from page https://www.piwheels.org/simple/pycypher/
  Could not find a version that satisfies the requirement pycypher (from versions: )
Cleaning up...
No matching distribution found for pycypher

Raspberry Pi EyeFi Server

I tried to ceate a Raspberry Pi as a standalone Photo catching device for multile EyeFi Cards.

Turns out that is not possible at the moment using EyeFi Mobi cards.

That is what I tried:

Hardware:

– Raspberry Pi

– EyeFi Mobi card

– Edimax USB Wifi Dongle

– Camera

Software:

– Raspian install
– https://github.com/dgrant/eyefiserver2/

Installation:

– git clone the eyefiserver2
– follow https://github.com/dgrant/eyefiserver2/wiki/Getting-Started

Starting

Start the script

sudo eyefiserver.py start /etc/eyefiserver.conf /var/log/eyefiserver.log

Check

[03/26/16 01:32PM][runEyeFi] - Eye-Fi server started listening on port 59278
tcp        0      0 0.0.0.0:59278           0.0.0.0:*               LISTEN      873/python  

Seems okay

Upload Key

The first issue was the upload key.
Connected two different eyefi cards with OSX and Windows 7 and was unable to find an upload key other then 00000000000000000000000000000000

On OSX:

/Users/$USERNAME/Library/Application Support/Eyefi/Eyefi Mobi/

But there is a SQL database in:

And you can do the following:

sqlite3 offline.db
SQLite version 
Enter ".help" for usage hints.
sqlite> SELECT o_mac_address, o_upload_key FROM o_devices;
00-11-11-11-11-11|12345678901234567890123456789012

Hm but still, using that upload key (was reducted) the eyefiserver2 did not work.

And I was unable to get a connection from my camera to my pi.

There is an issue reported in github:

https://github.com/dgrant/eyefiserver2/issues/9

That referenced the following Whitepaper:

https://www.os3.nl/_media/2013-2014/courses/ot/connor_stavros.pdf

So at the moment the problem has not been solved,an workaround would be using an Mac / Windows System, or to upgrade to the larger EyeFi Version:

Feel free to comment your solutions below.

Further reading:

Raspberry PI and Eye-Fi


http://support.photosmithapp.com/knowledgebase/articles/116903-why-do-i-see-multiple-eye-fi-card-upload-keys-ho
https://github.com/michaelbrandt/node-eyefimobiserver/blob/master/related_work/eyefi-mobi.py
http://www.ephototag.com/using-a-eye-fi-card/
https://launchpad.net/eyefi/+download
http://bazaar.launchpad.net/~jordens/eyefi/trunk/view/head:/README.rst
http://support.photosmithapp.com/knowledgebase/articles/152395-how-do-i-generate-an-eye-fi-card-upload-key
http://thewifibooth.com/article/eyefiuploadkey-x2pro/

Raspberry Pi migration to raspberry pi 2

Der Raspberry Pi ist ein äußerst erfolgreiches Gerät und erfrut sich gerade im Heimbereich großer Beliebtheit. Bemängelt wurden bis dato immer die etwas zu geringe Leistungsfähigkeit der CPU und der zu geringe Arbeitsspeicher (RAM).
Mit dem Rasperry Pi 2 wird an einigen Stellen (deutlich) aufgerüstet:

A 900MHz quad-core ARM Cortex-A7 CPU
1GB RAM

Like the (Pi 1) Model B+, it also has:

4 USB ports
40 GPIO pins
Full HDMI port
Ethernet port
Combined 3.5mm audio jack and composite video
Camera interface (CSI)
Display interface (DSI)
Micro SD card slot
VideoCore IV 3D graphics core

Gerade CPU und RAM und 4 USB Ports dürften erfreuen.

Nun möchte man jedoch nicht alle Pis neu aufsetzen. Möchte man die vorhandene Infrastruktur migrieren müssen ein paar Dinge beachtet werden:

Vorbereitung

Um das vorhandene System zu migrieren muss es erst auf den aktuellsten Stand gebracht werden:

sudo -s
apt-get update
apt-get dist-upgrade
apt-get install rpi-update
rpi-update
halt

(Quelle)
Diese Befehle bringen das System auf aktuellen Stand und fahren das System runter.

Backup

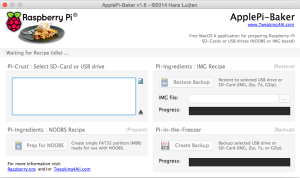
Bevor weitere Schritte durchgeführt werden auf jeden Fall ein Backup machen. Bei der Migration ist dieses Tool hilfreich: „Apple Pi Baker

Apple_Pi_baker

Damit kann zum einen Das Backup durchgeführt werden. Und ist auch danach noch sinnvoll.
Das Backup könnte pi_original.img heißen.

NOOBS

Für Nutzer, welche NOOBS genutzt haben um den Raspberry PI aufgesetzt haben sind folgende Anweisungen noch notwendig:

SD Card in PC / Mac mounten
download latest NOOBS Lite
Extract zip
Copy Everything extracted EXCEPT for `recovery.cmdline` to the root of your SD card

Source

SD Karte

Der Raspberry PI 2 unterstützt keine SD Karte mehr, es wird vielmehr auf Micro SD gesetzt, hier muss also eine neue Karte angeschafft werden.

Backup 2

Jetzt wird das Backup erstellt, welches dann auf die neue SD Karte überspielt wird (dieser Schritt kann übersprungen werden, wenn vorher schon eine Micro mit Adapter im Raspberry Pi 1 genutzt wurde)
Dieses Image nennt man pi_tomigrate.img

Dieses Backup spielt man nun mittels Apple Pi Baker auf die neue SD Karte (dauert insgesamt so ca. 40 minuten bei 16 GB)

Boot

Jetzt kann die Micro SD Karte in den Raspberry PI 2 eingesetzt und gebootet werden. Alle Daten werden erhalten und man kann direkt loslegen.

cat /proc/cpuinfo
processor	: 0
model name	: ARMv7 Processor rev 5 (v7l)
BogoMIPS	: 57.60
Features	: half thumb fastmult vfp edsp neon vfpv3 tls vfpv4 idiva idivt vfpd32 lpae evtstrm 
CPU implementer	: 0x41
CPU architecture: 7
CPU variant	: 0x0
CPU part	: 0xc07
CPU revision	: 5

processor	: 1
model name	: ARMv7 Processor rev 5 (v7l)
BogoMIPS	: 57.60
Features	: half thumb fastmult vfp edsp neon vfpv3 tls vfpv4 idiva idivt vfpd32 lpae evtstrm 
CPU implementer	: 0x41
CPU architecture: 7
CPU variant	: 0x0
CPU part	: 0xc07
CPU revision	: 5

processor	: 2
model name	: ARMv7 Processor rev 5 (v7l)
BogoMIPS	: 57.60
Features	: half thumb fastmult vfp edsp neon vfpv3 tls vfpv4 idiva idivt vfpd32 lpae evtstrm 
CPU implementer	: 0x41
CPU architecture: 7
CPU variant	: 0x0
CPU part	: 0xc07
CPU revision	: 5

processor	: 3
model name	: ARMv7 Processor rev 5 (v7l)
BogoMIPS	: 57.60
Features	: half thumb fastmult vfp edsp neon vfpv3 tls vfpv4 idiva idivt vfpd32 lpae evtstrm 
CPU implementer	: 0x41
CPU architecture: 7
CPU variant	: 0x0
CPU part	: 0xc07
CPU revision	: 5

Hardware	: BCM2709
Revision	: a01041
Serial		: REDUCTED

Meminfo:

vcat /proc/meminfo 
MemTotal:         949472 kB
MemFree:          476396 kB
MemAvailable:     860016 kB
Buffers:           90108 kB
Cached:           195736 kB
SwapCached:            0 kB
Active:           228896 kB
Inactive:          97048 kB
Active(anon):      40120 kB
Inactive(anon):      244 kB
Active(file):     188776 kB
Inactive(file):    96804 kB
Unevictable:           0 kB
Mlocked:               0 kB
SwapTotal:        102396 kB
SwapFree:         102396 kB
Dirty:                 0 kB
Writeback:             0 kB
AnonPages:         40144 kB
Mapped:            24088 kB
Shmem:               268 kB
Slab:             135256 kB
SReclaimable:     128760 kB
SUnreclaim:         6496 kB
KernelStack:         768 kB
PageTables:          852 kB
NFS_Unstable:          0 kB
Bounce:                0 kB
WritebackTmp:          0 kB
CommitLimit:      577132 kB
Committed_AS:      95684 kB
VmallocTotal:    1105920 kB
VmallocUsed:        3928 kB
VmallocChunk:     873148 kB

Banana Pi a better raspberry pi

Since serveral month, many Pis are in use within my network. I am using them for XBMC Raspberry, Syslog Raspberry, Kippo Raspberry Pi, surveillence pi, Nagios Raspberry Pi, Backup Pi a TOR Raspberry pi and of course they are using UPS for power supply.

But since some of the use cases are not that trivial, the tech specs of the raspberry are not high enough. But now a new pi is on the road: Banana Pi.

Specs of the Banana Pi (bold most important ones):
SoC: Allwinner A20*
(ARM Cortex-A7 dual-core, 1GHz, Mali400MP2 GPU)
System Memory 1GB DDR3 DRAM
Storage: SD card slot, Extensible with SATA connection
Video output: HDMI, Composite, Extensible with on-board LVDS connector
Audio I/O: HDMI,3.5mm stereo jack output,On-board microphone input
Connectivity: Gigabit Ethernet
USB: 2* USB 2.0 ports, 1* OTG micro USB port,1* micro USB for power supply**
Expansion: Extensible 26-pin headers, Camera connector, Display connector for LVDS and touch screen
Misc: 3* on-board buttons, (Power, Reset, Uboot key), IR receiver
Dimensions: 92mm X 60 mm
Weight: 48 g

Wow! It has gigabit onboard, an faster CPU (with integrated GPU!) , double Sytem memory, is compatible to extension modules of the original Raspberry Pi.

Especially for multimedia use cases, like HD (1080p and even higher) streaming the Banana Pi looks quite nice. At the moment, XBMC is not fully compatible to the banana pi, but the bigger the fan group the faster XBMC will work on supporting the new toy.

I will try to get one of the boards to get a first impression and will write about it in the future.

A good review of Banana pi is available at: http://raspi.tv/2014/banana-pi-review-first-impressions. The author is describing some problems while installation, but I think that is a common problem for new products. One particular complaint is very interesting, he mentioned that the linux SD card image is bigger then needed, because they included free space to the image – what a pitty.

Raspberry Pi nagios open monitoring distribution

This Blog Post will cover a howto for a complete monitoring setup.

I wanted to create a monitoring solution for a bunch of Raspberry Pi, a FritzBox, a QNAP Nas, Windows Clients and Apple OSX Workstation.

The monitoring device is another Raspberry Pi with Raspian installed.

The first coice for a monitoring solution is of course Nagios. It’s free, it’s open source and it’s high scalable. The problem with Nagios out of the box: it’s complex, it is too complex to do it in the small home network.

To save time, there is an complete collection of tools called OMD – open monitoring distribution.

OMD avoids the tedious work of manually compiling and integrating Nagios addons while at the same time avoiding the problems of pre-packaged installations coming with your Linux distribution, which are most times outdated and provide no regular updates.

OMD bundles Nagios together with many important addons and can easily be installed on every major Linux distribution. We provide prebuilt packages for all enterprise Linux distributions and also for some other, such as Ubuntu.

A german howto for installing OMD on an Raspberry Pi is available here.

This monitoring pi is now named nagiospi.

But to use the version 1.0 you will need the following commands:


sudo su
echo 'deb http://labs.consol.de/repo/stable/debian wheezy main' >> /etc/apt/sources.list
gpg --keyserver keys.gnupg.net --recv-keys F8C1CA08A57B9ED7 #install PGP Key of Sven Nierlein sven.nierlein@consol.de
gpg --armor --export F8C1CA08A57B9ED7 | apt-key add -
apt-get update
pi@nagiospi ~ $ sudo apt-cache search omd
cp2k - Ab Initio Molecular Dynamics
customdeb - Modfies binary Debian package
dicomnifti - converts DICOM files into the NIfTI format
isomd5sum - ISO9660 checksum utilities
libtemplate-provider-fromdata-perl - module to load templates from your __DATA__ section
python-pyisomd5sum - ISO9660 checksum Python module
tofrodos - Converts DOS Unix text files, alias tofromdos
vrflash - tool to flash kernels and romdisks to Agenda VR
omd - Open Source Monitoring Distribution
omd-1.00 - Open Source Monitoring Distribution, containing Nagios,
root@nagiospi:/#apt-get install omd-1.00

After that you have to install a OMD site:


root@nagiospi:/#omd create pimon
will create a folder /omd/sites/pimon/tmp
root@nagiospi:/#ifconfig # to gather the IP of your Pi

You can now access the webpage using


The site can be started with omd start pipi. The default web UI is available at http://raspberrypi/pipi/ The admin user for the web applications is omdadmin with password omd. Please do a su - pipi for administration of this site.

root@nagiospi:~# omd start pimon
Starting dedicated Apache for site pimon…OK
Starting rrdcached…OK
Starting npcd…OK
Starting nagios…OK
Initializing Crontab…OK
root@nagiospi:~#

Now access http://$IP_OF_YOUR_PI/pimon with default credentials stated before.

To gather data, you will now have to login to another pi: senderpi.

The senderpi will provide an interface / port for the nagiospi to collect data. To do so, the script check-mk from Matias Kettner is perfect. It is available for Linux, Windows etc.

Want to learn more about Nagios / Monitoring:

root@senderpi:/#sudo apt-get install xinetd check-mk-agent

After that you have to edit at least the file: vi /etc/xinetd.d/check_mk
For security reasons, remove the # in the line and include the IP of $nagiospi

root@senderpi:/#vi /etc/xinetd.d/check_mk
only_from = 127.0.0.1 $IP_OF_YOUR_NAGIOSPI

so that only your nagiospi can access the port and the information.
To enable the script, change the value in the file from yes to:

disable = no

Restart xinetd:

root@senderpi:/# service xinetd restart
[ ok ] Stopping internet superserver: xinetd.
[ ok ] Starting internet superserver: xinetd.

Check if the service is running:

root@senderpi:/# netstat -anon | grep 6556
tcp 0 0 0.0.0.0:6556 0.0.0.0:* LISTEN aus (0.00/0/0)
root@senderpi:/# nc 127.0.0.1 6556
<<<check_mk>>>
Version: 1.1.12p7
AgentOS: linux
PluginsDirectory: /usr/lib/check_mk_agent/plugins
LocalDirectory: /usr/lib/check_mk_agent/local
AgentDirectory: /etc/check_mk
OnlyFrom: 127.0.0.1 $IP_OF_YOUR_NAGIOSPI
(...)

To increase security, use the following iptables rule to prohibit unauthorized access to the OMD / Nagios / mk-check port:

iptables -A INPUT -i eth0 -p tcp -s $IP_OF_YOUR_NAGIOSPI --dport 6556 -m state --state NEW,ESTABLISHED -j ACCEPT

You can also check from your nagiospi command line:

nc covert 6556 $IP_OF_YOUR_SENDER_PI

Now go to the page:

http://$IP_OF_YOUR_NAGIOSPI/pimon/check_mk/
Default username: omdadmin password: omd

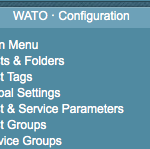
And go to „Hosts and folders“ on the left menu.

Click create host and insert all of the data:$IP_OF_YOUR_SENDER_PI.
–> Save and check services
Your nagiospi now tries to connect to your senderpi and checks for info.
Save it.
On the top screen there is a button „1 Change“ klick it and confirm it.

To change the password:

http://$IP_OF_YOUR_NAGIOSPI/pimon/thruk/#cgi-bin/conf.cgi?sub=users&action=change&data.username=omdadmin&

Now your host has been added to monitoring. All information should be available to your nagios and you will be alerted e.g. the SD card of the PI is running out of space.

Raspberry Pi Backup script

Hier mal ein Tipp zum Wochenende zu einem Raspberry Pi Backup script welches ganz modular angesteuert werden kann.

Zur Auswahl stehen dd, tar, rsync und xbmc.
Es kann auch ausgewählt werden, welche Anzahl an Backups vorgehalten werden soll.

Die Backups können dabei auf z.B. ein Qnap NAS, oder eine externe Festplatte gespeichert werden.

Das Backup script ist hier erhältlich.

Kippo Honeypot stop

To stop Kippo Honeypot, you could use two options, first you could check your connections:


netstat -l -p

and then kill the process with the PID via


kill -9 $PID

Or you could use the small script available at github (https://github.com/beardyjay/bHoneypot/issues/15):

#!/bin/sh

PIDFILE=kippo.pid

if ! [ -f $PIDFILE ]
then
echo „Kippo is not running ..“
exit
fi

PID=$(cat $PIDFILE)

echo „Stopping Kippo ..“
kill -TERM $PID
rm -f $PIDFILE

with the result:


pi@raspberrypi ~/kippo-read-only $ ./stop.sh
Stopping Kippo ..

Raspberry Pi USV UPS

Raspberry Pi, the cheap computer for various stuff like a surveillance cam gets another cool toy: The PI USV from CW2.

While pis are used in more and more aspects, it gets critical to ensure power supply. A normal USV / UPS (unterbrechungsfreie Stromversorgung / uninterruptible power supply) is fine, but a spcial USV for the PI has some benefits:
– propper shutdown
– power supply monitoring to check the supply (batterie only, no batteries given, etc.)

The USV / UPS will be attached via the „normal“ micro USB

It will send signals like BATLOW, BATPOW, PIREADY via GPIO.
Even without using the GPIO ports, three LEDs are indicating the status of the USV.

Cw2. is based in Germany

Costs? 29,99 €.

or at Amazon:

PI USV can also be used as an Arduino USV and a Beaglebone USV (Arduino UPS / Beaglebone UPS)